
Help
CONTACT US
Your satisfaction is important to us and we remain attentive to your needs. Don't hesitate to contact us if you have questions or specific requests. This page offers you several means to get answers to your questions or to send us your comments:
- Click the link Email Us to send us a secure message via this site
- Call our Customer Service department
Secure messaging
Contact us via a secure channel. Just fill out the fields and click Send. Upon receiving your message, we will send you an acknowledgement under the Messages and alerts section of B2B Bank Online Banking Services and respond to your inquiry within 48 business hours.
Sign out
Securely close your B2B Bank Online Banking Services session by clicking Sign out. For added security, close your browser after ending your session.
If you're using a public or shared computer (Internet café, office computer, etc.), remember to empty the browser's cache memory. Remember to log off from your banking session before leaving your computer unattended.
For safety reasons, online sessions are automatically terminated after 20 minutes of inactivity. In such case, you will be required to enter your sign on information and open a new session.
Clearing your browser's cache memory
Cache memory is a temporary memory in your Web browser (e.g. Microsoft Internet Explorer, Mozilla Firefox, Google Chrome, Apple Safari, etc.) that saves a copy of the latest pages that you've viewed. When you return to a previously viewed page, the browser retrieves the content from the cache memory instead of the actual website. In a nutshell, cache memory speeds up the retrieval and display time when surfing the web.
Make sure to clear your browser's cache memory or history to prevent your confidential data from being viewed by anyone else.
How to clear your browser's cache memory
Microsoft Internet Explorer 9.x for Windows
- From the Tools menu, click Delete Browsing History.
- Check Temporary Internet files and website files (and any other option you feel is necessary: Cookies and website data, history, etc.).
- Click Delete.
Mozilla Firefox 3.5 or later
- From the Tools menu, click Clear recent history.
- Select Everything under Time range to clear.
- Click Details
- Check the Cookies and Cache boxes only.
- Click Clear now.
Safari 5 or later
- From the Develop menu, select Empty cache
- To display the Develop menu from the Safari menu:
- Click on Preferences, then on the Advanced tab.
- Check the Show Develop menu in menu bar box
MY ACCOUNTS
SUMMARY
The Summary shows your list of accounts and their current balances as well as any messages or alerts that are waiting in your message box. Accounts are grouped by type: Bank accounts (e.g. chequing and savings), line of credit accounts and mortgage loan accounts.
Your bank statements are available in electronic format. To receive e-statements, you must open an epost account and link it to B2B Bank Online Banking Services. To start receiving e-statements, go to Communication Preferences under the My Profile section.
E-statements remain available for a period of 7 years, are secure and economic.
If your epost account is already linked to B2B Bank Online Banking Services, you can view your e-statements under the Messages and alerts section.
You can also link an existing epost account to B2B Bank Online Banking Services. To do so, you will need to have your epost id and password. You may need to contact epost to get this information.
You can open an epost account via the My Profile section under Communication Preferences.
Transaction History
Select an account from the drop-down list to view the Transaction History page where you can search and filter the transactions or download them.
You can view transaction details associated with any given account. Some account types offer more information and options than others.
Use Advanced Options to filter transactions and specify your search criteria.
Balance
The balance shown is the current available funds less any funds on hold.
Account details
Click Show more account details to view more information on the account. Click it again to hide account details.
Transaction history of an account
Select an account from the list of your accounts. Each item of the drop-down list displays the name, number and balance less funds on hold of the account.
Search by date
Once you've selected an account, the transaction history page will display by default all transactions within the last 30 days.
You can change the date range to filter the transactions. Click the calendar icon to specify the From (beginning of the search period) and the To (end of the search period) fields. Then, click on the Search button to apply your criteria.
Depending on the type of account, the account history may go back up to 24 months from the current date.
Other account types don't enable searches by date.
The specified period will be displayed at the top followed by the search results.
Search by month
To view transactions from a specific month (transaction history going back up to 24 months), check the By Month radio button and select a month from the drop-down list.
Then, click on the Search button to apply your criteria.
Searching by month is not available for certain account types.
Advanced Options
Click Advanced Options to filter your search (by cheque, bill payment, deposit, etc.). Some of the selections will allow you to be more specific. For example, selecting Search by Amount will generate a new field in which you can specify the amount to search. Available options depend on the account type. Once you are done, click the Search button to apply the search criteria.
Download the transaction history
You can download the transaction history in a format compatible with Quicken, Excel, Simply Accounting, etc. Select the software from the Download drop-down list and click the Search button.
The next screen will display a warning message. Read it and click Continue to download or Cancel to return to the Transaction History page.
Your browser will notify you when the download is complete. Follow your browser's instructions to access the downloaded file.
If you're using a public computer, remember to delete the file before sigining off.
Date
By default, the Transaction History is sorted by date, starting with the most recent. Clicking Date in the heading will sort the transactions from the oldest to the newest. Clicking Date once again will reorder them from the newest to the oldest.
Description
Each item in the Transaction History has a description, some with confirmation numbers. Click Description in the heading to sort transaction descriptions in alphabetical order.
Balance
Click Balance in the heading to sort balances in descending order. Click Balance once again to sort in ascending order. To return to the default sort order, click Date.
View Notifications – Messages & Alerts
This page displays important alerts and messages. Click the message title to read its content. If no messages are currently available, this section of the page will not display.
The messaging service also alerts you when you receive a new message. To keep abreast of your messages, make sure to provide an email address that you use frequently. Go to My Profile to confirm your address, phone number and email address.
Delete Notifications – Messages & Alerts
Click the Delete link to delete a message or alert. However, we recommend you read a message before deleting it.
PAY BILLS
You can pay bills from a large number of companies and suppliers. Go to the Pay Bills section to pay a bill immediately or to schedule post-dated or periodic payments. Go to the Scheduled Payments section to program bill payments at a specific frequency and date in the future.
Make Payments
From the drop-down list, select the source account (i.e. account from which to draw the funds).
Check the box beside the name of the payee who will be receiving the payment. You can select more than one payee.
If there is no reference number associated with the payee, enter the number of the bill to pay.
Click the calendar icon to select the date on which to pay the bill. You can pay the bill immediately or make it a post-dated payment.
Enter the dollar amount to pay to the payee.
Click Pay Bills to continue or Cancel to clear all fields.
After you click Validate to confirm the transaction, a confirmation screen will display the details of the transaction. You can print this screen for your files.
Program a Post-dated Payment
You can program post-dated payments up to 365 days in the future.
Set as default account for bill payments
You can set a default account from which funds will be withdraw by checking Set as default account for bill payments. You can uncheck this option at any time to select another account.
Program a Recurring Payment
From this page, you can set up recurring bill payments to automatically pay your bills at a determined frequency. A recurring payment can be programmed on a daily, weekly, bi-weekly, monthly or month end basis.
From the From Account drop-down list, select the source account (i.e. account from which to draw the funds).
Using the drop-down list, select the payee who will be receiving the payment.
Enter the dollar amount of the scheduled payment. Make sure your account is sufficiently provisioned at the expected date of payment.
Click the calendar icon to select the date of the first scheduled payment. The default is today's date.
Select the payment frequency from the drop-down list.
Select the date of the last scheduled payment. By default, the payment is set to monthly.
Click Pay Bill to save the scheduled payment or Cancel to clear the fields.
Then, click Validate to confirm the information.
A confirmation screen will display the details of the new scheduled payment. You can print this screen for your files.
Add a Payee
Add a payee to your list of payees in order to issue payments on the spot as well as post-dated or scheduled payments.
You can add a payee to your list either by searching by name or alphabetically.
Search by Name
To search for a payee by name, click the Search by name tab. This is the default tab when viewing the Add Payee page.
In the Payee Name field, type the full or partial name of the payee you wish to add to your list. This field requires 3 to 40 characters to launch a search. Then, click Search.
The screen will display a list of payees sorted in alphabetical order. Click the payee's name to select it. Then, enter the reference number printed on the payee's bill. Click Add Payee to continue or Cancel to return to the Add Payee page.
Alphabetical Search
To search alphabetically, select the Search by alphabetical order tab.
From the list 0-9 ABCDEFGHIJKLMNOPQRSTUVWXYZ, start by clicking the letter (or number as the case may be) corresponding to the first letter of the payee's name. The screen will display a list of payees sorted in alphabetical order. By default, this screen lists payees whose name start with A. Click the name of the payee you wish to add. Then, enter the reference number printed on the payee's bill. Click Add Payee to continue or Cancel to return to the Add Payee page.
Reference Number
The reference number is printed on the payee's bill. The format is displayed under the reference number field. For example: Format: 9999999. This means you must enter a 7-digit number.
A confirmation screen will display the details of the new payee. You can print this screen for your files.
Please note that, by default, the system does not store the reference number for bills with variable numbers; only the payee name is populated. You must enter the reference number printed on the bill upon issuing the payment.
Delete a Payee
If you no longer wish to settle a payee's bills via B2B Bank Online Banking Services, you can easily delete that payee from your list. Important: deleting a payee will also delete all associated future post-dated and scheduled payments.
To delete a payee, click Delete located next to the payee to be deleted among the list of payees. A validation screen will appear before deleting the payee. Make sure that the selected payee and associated reference number corresponds to the payee you wish to delete. Click Validate to continue or Cancel to return to the Delete Payee page. A confirmation screen will display the details of the deleted payee. You can print this screen for your files.
Schedule Payments
This page displays information on upcoming payments, including the payment amount, source account, payee name, payment date and frequency as well as the next payment date.
Delete a scheduled payment
You can delete a scheduled payment from your list. Important: deleting a scheduled payment will delete all associated future post-dated and scheduled payments.
To delete a scheduled payment, click Delete located next to the payment that you wish to cancel among the list of scheduled payments. A validation screen will appear before deleting the payment. Make sure that the selected payment corresponds to the payment you wish to delete. Click Validate to continue or Cancel to return to the Scheduled Payments page. A confirmation screen will display the details of the deleted scheduled payment. You can print this screen for your files.
Modify a scheduled or recurring payment
You cannot modify a scheduled payment. However, you can delete the payment and program a new one by following the Delete a scheduled payment and Make Payments process to issue an immediate or post-dated payment, or Program a recurring payment process for a recurring payment.
Transfers
You can easily transfer funds between your B2B Bank accounts. You can also transfer funds to and from your B2B Bank accounts and account from other financial institutions.
Start by entering the amount to transfer in the Amount field. Then, select a source account (i.e. the account from which to draw the funds) and the destination account (i.e. the account to which the funds will be deposited). Click the calendar icon to select the date of the transfer.
Immediate transfer
Check Now to transfer the funds the same day.
Click Submit to continue or Cancel to clear all fields.
A validation screen will appear before transferring the funds. Check if the displayed information is correct and click Validate to confirm the transfer, Cancel to cancel the transaction or Modify to return to the previous screen and modify the transfer.
A confirmation screen will display the details of the transfer. You can print this screen for your files.
Post-dated transfers
You can program a transfer at a specific date in the futre by checking On and selecting a transfer date using the calendar.
Click Submit to continue or Cancel to clear all fields.
A validation screen will appear before making the transfer. Check if the displayed information is correct and click Validate to confirm the transfer, Cancel to cancel the transaction or Modify to return to the previous screen and modify the transfer.
A confirmation screen will display the details of the transfer. You can print this screen for your files.
Recurring Transfers
You can schedule recurring transfers (i.e. automatic transfers at a specific date and frequency in the future). A recurring transfer can be programmed on a daily, weekly, bi-weekly, monthly or month end basis.
Under When to Transfer, check Every and select a transfer frequency from the drop-down menu. Then, click the calender icon to select the date of the first and last transfer. Finally, click Submit to continue or Cancel to clear all fields.
A validation screen will appear before making the transfer. Check if the displayed information is correct and click Validate to confirm the transfer, Cancel to cancel the transaction or Modify to return to the previous screen and modify the transfer.
A confirmation screen will display the details of the transfer. You can print this screen for your files.
Scheduled Transfers
This page displays information on upcoming transfers, including the source account, destination account, amount and transfer frequency.
Delete a Scheduled Transfer
You can delete a scheduled transfer from your list. Important: deleting a scheduled transfer will delete all associated future post-dated and scheduled transfers.
To delete a scheduled transfer, click Delete located next to the transfer that you wish to cancel among the list of scheduled transfers. A validation screen will appear before deleting the transfer. Make sure that the selected transfer corresponds to the transfer you wish to delete. Click Validate to continue or Cancel to return to the Scheduled Transfers page. A confirmation screen will display the details of the deleted scheduled transfer. You can print this screen for your files.
Request Forms
You can submit requests directly from B2B Bank Online Banking Services to link an external account.
Link an External Account
You can link an account from another Canadian financial institution (external account) to one of your B2B Bank accounts in order to transfer funds between accounts.
To link an external account, use the drop-down list to select a financial institution.
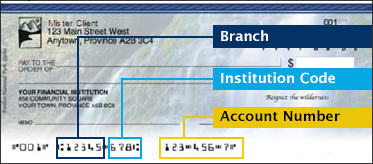
Enter the branch and account number of the financial institution in the appropriate fields. This information is printed on the cheques from your financial institution. To view a sample, see below:
Then, click Next Step to continue or Cancel to return to the previous screen.
A confirmation screen will display the details of the request to Link an external account. Check if the information is accurate and click Next Step to validate and continue or Previous Step to modify your request.
Agreement for transferring funds from another Canadian financial institution
Read the agreement for transferring funds from another Canadian financial institution and check the box to accept the terms and conditions. Click Next Step to validate and continue or Previous Step to modify your request.
Proof of account ownership
This step is for security purposes and allows B2B Bank to confirm that the designated account is yours.
Write a valid cheque drawn from the account to be linked. Your name must be printed on the cheque. Make out a cheque to yourself under Order of. Write the amount of your choice. This amount will be transferred from the external account to the linked B2B Bank account.
Note: the cheque must be valid and cleared by the issuing bank in order to finalize the process. The Bank will not accept cheques that are not pre-printed with the account holder’s name, specimens or reproductions.
Mail the cheque to:
B2B Bank
P.O. Box 458, Station A
Toronto, Ontario
M5W 1E4
Then, click Submit Request to continue or Previous Step to return to the Transfer agreement page.
A confirmation screen will display the details of the request to link an external account. You can print this screen for your files.
Messages and alerts
The B2B Bank Online Banking Services messaging system is a secure and confidential means of communication between you and B2B Bank. You will be notified when B2B Bank sends you a message.
These messages consist of personal messages and financial reminders. Personal messages are sent by Bank representatives regarding specific financial matters. They appear on the Messages and alerts page as well as on the Summary page under the Messages section.
Financial reminders are generated by the banking system to advise you of important financial matters. There are two types of financial reminders: regular reminders (such as an impending maturity date) and urgent messages. The listed messages are grouped by type.
Read a message
Click the message subject or the Read More link.
Unread messages are displayed in bold. Read messages are not in bold (i.e. you accessed the content of the message).
Delete a message
To delete a message, click Delete next to the message subject or at the end of the message body if the message is already open.
Send a secure message to B2B Bank
To send a secure message to B2B Bank, simply fill out and submit the form under the Contact Us section. You will receive a confidential and secured response under the Messages and alerts section within 48 business hours.
View your epost™ inbox
This page lists the items in your Canada Post epost mailbox. It displays a description of each document (mailer and type of document), the sent date and, for bills and statements, the due date and amount due.
Open an epost document
To open documents from your mailbox, click View next to the document you wish to open. A pop-up window will notify you that you will be automatically directed to the epost website. Click OK to go to the epost site and read the document or Cancel to continue your banking session.
Clicking OK will open the epost website in another tab on your browser. To return to your banking session, select the B2B Bank tab.
Delete an epost document
To delete an item from your epost mailbox, click Delete. Make sure that the selected item corresponds to the item you wish to delete. Click Validate to delete the document or Cancel to return to the previous page.
Manage epost™ mailers
From this page, you can add, modify or delete mailers linked to your epost account and modify your epost communication preferences.
Add a mailer
To add a mailer to your epost account, click the Add a new mailer link at the top of the page. To accelerate the process, select a province from the drop-down list and click Search to view only mailers from your region. Select a mailer from the list of available mailers. Click Continue to move to the next step or Cancel to return to the previous page.
Make sure that the selected mailer corresponds to the mailer you wish to add. Click Continue to move to the next step or Cancel to return to the previous page.
A pop-up window will notify you that you will be automatically directed to the epost website. Click OK to go to the epost site and add the mailer or Cancel to continue your banking session. Clicking OK will open the epost website in another tab on your browser.
Follow the epost process to add the mailer.
To return to your banking session, select the B2B Bank tab.
Modify a mailer
To modify a mailer linked to your epost account, click Modify next to the name of the mailer to modify.
A pop-up window will notify you that you will be automatically directed to the epost website. Click OK to go to the epost site and modify the mailer or Cancel to continue your banking session. Clicking OK will open the epost website in another tab on your browser.
Follow the epost process to modify the mailer.
To return to your banking session, select the B2B Bank tab.
Delete a mailer
To delete a mailer linked to your epost account, click Delete next to the name of the mailer you wish to delete.
A pop-up window will notify you that you will be automatically directed to the epost website. Click OK to go to the epost site and delete the mailer or Cancel to continue your banking session. Clicking OK will open the epost website in another tab on your browser.
Follow the epost process to delete the mailer.
To return to your banking session, select the B2B Bank tab.
Modify your epost communication preferences
To modify your epost notifications settings, click the update your mail delivery notification link at the top of the page.
A pop-up window will notify you that you will be automatically directed to the epost website. Click OK to go to the epost site and modify your communication preferences or Cancel to continue your banking session. Clicking OK will open the epost website in another tab on your browser.
Follow the epost process to modify your preferences.
To return to your banking session, select the B2B Bank tab.
Link your epost account
You can link an existing epost account to B2B Bank Online Banking Services. To do so, you will need to have your epost id and password. You may need to contact epost to get this information.
You can link an existing epost account or create a new one from your Communication Preferences under the My Profile section.
Under the section My Statements are sent via, click How do I switch to Electronic Statements - epost™ delivery?
Read the terms and conditions and click the I Accept button.
A pop-up window will notify you that you will be automatically directed to the epost website. Click OK to go to the epost website or Cancel to continue your banking session. Clicking OK will open the epost website in another tab on your browser.
Follow the epost process to open a new account or to link your epost account to B2B Bank.
To return to your banking session, select the B2B Bank tab.
My Profile
Contact Information
View, review and modify your contact information with B2B Bank. Please remember to update your contact information when moving.
Current Information
This page displays the information currently on file with B2B Bank including your address, phone number, and email address.
New Contact Information
You can update your contact information in a flash. First, check the box corresponding to the type of information you wish to update: Address or Telephone / Email.
Change your address
Check the Address box and address fields will appear and will be populated with the information currently on file with B2B Bank. Modify the fields as required.
Change your phone number or email address
Check the Telephone / Email box and the telephone and email fields will appear. Modify the fields as required.
Effective date of changes
Use the calendar to select the effective date of the changes. Please note that when applying changes to a future date, all information currently on file will remain effective until then.
Click Submit to move to the next step.
A validation screen will appear before applying the contact information changes. Review the information and click Validate to confirm the changes.
A confirmation screen will display the details of the changes. You can print this screen for your files.
Change your password
You can change your B2B Bank Online Banking Services password at any time under this section. Don't hesitate to change it often, especially if you suspect that someone else knows your password.
Enter your current password in the first field and enter your new password in the second and third field to confirm your choice.
Remember that your password should be comprised of a minimum of 8 and a maximum of 20 alphanumeric characters (letters and numbers only), with at least one letter and one digit. Your password can't contain special characters such as $%?&! or capital letters.
Once you've entered the information in the fields, click Submit to continue or Cancel to return to the previous page.
Remember your password because it will be in effect when you open your next B2B Bank Online Banking Services session!
Choosing a secure password
A good password is not necessarily complicated. Instead, it should follow a pattern that is easy to remember yet difficult to guess by disaffected individuals.
Tips on how to choose a strong password:
- Your password should be at least 8 characters long.
- Use a combination of letters and at least one number.
- Be creative. Use the first letter of each word of a memorable sentence or phrase, then make it even tougher by changing some of the letters to numbers (e.g. use a "3" to replace an "e").
- Try a mix of your pet's name, your favourite numbers, the street you grew up on or other combinations.
Precautions:
- Never use your name, date of birth, driver's license or passport number.
- Commit your password to memory and don't store it on your computer or in your mobile phone.
- Change your password often.
- If a website or browser asks to remember your password, unclick that option and take the time to re-enter your password each time.
- Clear your browsing history or cache memory after closing your online banking session.
- Don't repeat numbers (5555) and letters (bbbb). Don't use simple sequences (abcdefg or 56789) or letters that appear in a row on your keyboard (qwerty).
- Don't use the same password everywhere. Cybercriminals hack passwords and user names from ill-secured websites and use them to access highly-secured websites, including financial websites.
Change your security image
A security image is a means to add an extra level of security to your banking session. Don't hesitate to change it often, especially if you suspect that someone else knows your security image.
Clicking an image circumvents keyloggers that can record your key strokes.
Additionally, the image is not always in the same place to prevent screen capture malware which transmit screenshots.
To modify your security image, select your current security image and click Next Step to continue or Cancel to return to the Contact Information page.
Then, select a new security image by clicking on a different image. You can view a larger selection of images by clicking Display another series of images.
Once you've selected an image, click Next Step to continue or Previous Step to return to the Change Security Image page.
Commit your new image to memory because it will be in effect when you open your next B2B Bank Online Banking Services session!
Change your security questions
A security questions is a means to confirm that you are the account holder.
Ideally, the question and answer should be relevant only to you. The idea is to associate two elements, not necessarily an answer to a formal question.
For example:
Question: two times two. / Answer: date squares
Create three questions and answers known only by you. Your questions and answers must contain between 6 and 60 characters each. Please note that your questions/answers are case sensitive and that the system will also memorize spaces. Enter your questions and answers in the appropriate fields.
Tips:
- Choose questions and answers that you are sure to remember.
- Don't disclose them to anyone.
- The answer should be precise enough to be impossible to guess.
- Avoid sensitive personal information (social insurance number) or information easily found on social networks (Facebook Twitter, etc.).
Once you've entered your questions and answers, click Next Step to continue or Previous Step to return to the Contact Information page.
Commit your security questions to memory because they will be in effect when you open your next B2B Bank Online Banking Services session! The system will give you the possibility to save your answers. Why?
Firstly because it protects you against keyloggers which could record your keystrokes. Security questions will only popup when you login from a computer that does not have a cookie from a previous visit or when the existing cookie has expired.
Secondly because it makes your life easier by skipping an authentication step.
Communication Preferences
From this page, you can select how you want the Bank to communicate with you and the type of document to send.
Promotional Communications
If you allow the Bank to send you promotional communications regarding its products and services (promotions, contests, offers, etc.), check all boxes corresponding to your preferred means of communication: Mail, Inserts in administrative communications, Telephone, Email.
Please note that these settings apply only to promotional communications.
Once you’ve checked the appropriate boxes, click Change Preferences to apply the new settings or Cancel to restore your previous choices.
Bank Statements and Administrative Communications
You can choose to receive your statements electronically via Canada Post’s epost service or by mail.
By default, statements and administrative communications are sent by mail.
To start receiving your statements via epost, click How do I switch to Electronic Statements - epost™ delivery? or How do I create or link an epost™ account?
Click Get Electronic Statements or Create epost™ account.
A pop-up window will ask you to confirm if you wish to receive electronic statements. Click OK to go to the epost website or Cancel to continue your banking session. Clicking OK will open the epost website in another tab on your browser.
Follow the epost process to open a new account or to link your epost account to B2B Bank.
To return to your banking session, select the B2B Bank tab.
If your account is already linked to epost and you no longer wish to receive electronic statements, click How do I switch to paper statements- standard mail delivery? or How do I unlink my epost™ account?
Security Guaranteed
B2B Bank is committed to protecting your privacy and has implemented stringent security measures to provide you with a secure access to banking services. Read this section for details.
Last Session
View the date and time you last logged in on B2B Bank Online Banking Services.
Site Map
View and access any page in B2B Bank Online Banking Services in a click.
Security and Privacy
B2B Bank is fully committed to keeping your personal information secure and confidential. This page describes the details of our commitment.
Legal notice
This section details the legal terms and conditions to use B2B Bank Online Banking Services.